Sunday 27 January 2013

Lipstick Haul

If there is one beauty product that I am in constant demand for, its lipstick. I love lipsticks because there are so many colour options these days, giving you the chance to experiment with different shades to change up your look. Lipstick can completely transform your look and that's what I love about it, and is probably why I have so many! Put these on over the winning combination of an exfoliating scrub following by a nourishing balm (see my last post), and your lips will look super luscious.


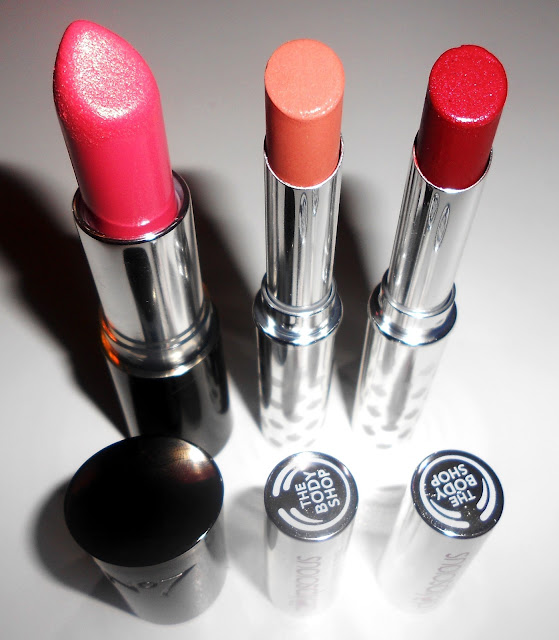
1. No7 Moisture Drench lipstick in shade 'Waterlily'
2. The Body Shop Delipscious sheer lip colour in shade 01
3. The Body Shop Delipscious shade 09


I was in desperate need of a natural pink lipstick that gave some added radiance to an everyday look. After much deliberation over which shade I went with 'Waterlily' by No7 because I have many of No7's moisture drench lipsticks and they are excellent quality and always have an incredibly diverse selection of colours. The texture is so creamy and just glides onto your lips, also moisturizing them whilst still managing to provide colour. The pigmentation in these is great, much like MAC's, and you can go for ages without the need to reapply. This shade also has slight shimmery particles, but they are not so noticeable which makes it perfect for that subtle everyday shade. This is going to be a permanent shade in my make up bag as it will go with practically everything. It also reminds me a lot of MAC's 'Chatterbox'- a pink shade that makes your lips look natural- but better. These No7 lipsticks are priced at £9.50 in all Boots stores.


Next I went into the body shop and found these sheer lip colours to be half price- that's only £3 instead of £6. However when I went in there was an offer which meant I got two gorgeous shades for £4- what a bargain! What I like about these shades is that they are completely sheer, so they add a touch of colour to your look without it being too overdone. I think these are a great product for every day use, making your lips super shiny with just a hint of natural colour. The formula of these is the texture of a lipstick, but they glide on like a soft buttery balm, with a slight glossy finish, ultra lightweight to wear. Although they are not vastly pigmented, they do have good staying power and offer the chance to wear colour that looks as though you are not wearing any! The first shade I picked out was this one below, a dark red with blue undertones. It looks much darker than it actually comes out due to the sheerness of it, but this just creates a softened look with a slight hint of colour. The next shade was this nude shade which I think is great to have in your make-up bag as a nude lip is always perfect to go with a stand out eye. It is much more matte in finish but still gives a slight glow to the lips. I think these colours and the formula of this brand is ideal for spring every day wear as they are not too overpowering and give you a radiant and healthy appearance, managing to perk up any seemingly dull look.


Shade 09


Shade 01
New lip products: Korres and Lush

Ever since I began blogging a few months back, I have enjoyed hearing so much about recommended products that have such a buzz surrounding them. Two of the most talked about products on the beauty blogging scene seem to be these two lip products: Bubblegum Lip Scrub from Lush, and Korres Lip Butter. Given the immense hype surrounding them, I thought I ought to try them and see if they really are worth the hype they are getting.


So first up is this exfoliating lip scrub from Lush. This is great for anyone who has dry skin on their lips, which I am prone to especially in these cold winter months! I wanted to try this out as sometimes a balm just doesn't do the job of removing that dry skin, which looks so undesirable and is particularly heightened when you wear lipstick. Seen as I'm such an avid lipstick wearer, I always try and make sure my lips are looking and feeling as smooth and as moisturized as possible. To begin with this product smells unbelievable. I can't even describe how good it smells unless you've tried it yourself. It is exactly like bubblegum and candy, super sweet and literally good enough to eat. As soon as I tried this for the first time, I noticed the dead skin cells peeled off right away, and with constant use this will seriously remove this problem altogether. However, as it is an exfoliating scrub and not an exfoliating balm, like one I have from Champneys, it tends to dry out your lips. This can be fixed no problem though of course, as you just put some balm on straight afterwards and your lips are super soft. I've heard some people say you just lick off the excess- which i'm sure is fine as the main ingredient is caster sugar. At £5.25, I would have normally said this is a little steep for a lip scrub however I do think it is worth the money, and certainly worth the hype. Other flavours are also available including Popcorn and Mint Julips. Bubblegum is my favorite however as the candy scent is literally unreal!


After using the gorgeous bubblegum scrub, using this lip butter from Korres is a winning combination. I heard so much about this but never knew where to find it, until I came across it on Feel Unique. At £6.30 I thought is this really worth it? What sets it apart from my any other lip balms, particularly my trusty Carmex and good old Vaseline. Well to begin with, it is not just a normal balm as it is a really hydrating lip butter, keeping your lips nourished for hours and acts as a great base for lip colour. It melts onto the lips and has such a thick, creamy texture that also adds a light shine and tinted finish. I chose the colour Jasmine, and like the Lush scrub, it smells unreal! It doesn't remind me of jasmine but it is such a sweet lovely smell. The combination of Shea butter and rice wax offers deep hydration and softness, making it perfect for chapped lips. What's more, the packaging is so adorable, containing two small boxes that slide into each other with the pot inside; I couldn't bring myself to throw it out! The only downside is the price which some may find a little pricey for a lip balm, and also the size of the pot is quite small and i'm already quite far down into mine. However I do think if you really suffer from chapped lips this is a great investment and definitely worth a try to see what everyone is talking about. 
***

Have you guys tried these products?
xxx

Saturday 26 January 2013

Alternative Smokey Eye


Taken END of the night- thanks primer!

***

Hey guys!
Last night I went to another 18th party, so I thought it would be a great chance to wear a livelier take on my favorite smokey eye look. I also had the perfect blue dress ever, but didn't want to just use a boring blue shadow. Therefore I teamed it with the most beautiful green shadow, and electric purple through the crease to really enhance my eyes and make them stand out. 

Eye shadows used:


MAC Mega Metal Shadow in 'Ego' 
Famous by Sue Moxley purple eye shadow shimmer in shade 12

To get this eye look I used a simple navy base, (on top of a good primer of course), and then I took the green across the lid, winging out slightly. I then took the purple through the crease and winged out, blending with the two colours. Blending for any smokey eye is absolute key as you don't want any harsh lines; you want the colours to jut fade into each other. The easiest way to do this is to take a clean brush and just blend outwards until your lines are even and not too severe. 'Ego' by MAC is literally my favorite shade ever. It is super pigmented and has great staying power. Its not a shade you can wear every day, but it makes a great evening look! Both shadows are also metallic with shimmer, therefore they work great together. Pair this with purple lips and a fantastic, dramatic and glamorous look is created. 

Monday 21 January 2013

Cappuccino Nails

Seen as my last post was such a lengthy one, this is just a quick nail look which I have been loving at the moment. I think it is such an ideal shade for this period, whilst we are coming to the end of winter, but not yet ready to sport the bright spring trends. From Barry M, this is in shade 341 entitled 'Cappuccino'. I would describe this unusual, muted shade as a neutral beige coffee colour, but with noticeable taints of lilac. After two coats however, the cappuccino colour really does come through. This makes it a bit different to a typical, somewhat dull beige, giving a bit of life to your fingertips. What I love most about this shade is how it will go with almost anything. I know I can wear this shade and feel free to match it with any outfit- always an added bonus! Barry M are renown for their nail polishes as they are always of such great quality and have such a diverse range of colours. The have excellent staying power and leave your nails chip free for weeks, especially if you add a topcoat over the top to seal it. What's more at £2.99 a bottle, these polishes are super inexpensive, making it incredibly easy to build an extensive collection!
***


Saturday 19 January 2013

The Liebster Blog Award

Hey guys!
I've seen this circulating around blogs for months now, always curious as to what it is really about. That is until today when I was kindly nominated by two lovely people- 


The rules are as following:
  • List 11 facts about yourself
  • Answer the 11 questions given to you
  • Ask 11 new questions to the bloggers you chose to nominate
  • Choose 9 bloggers with 200 or less followers to nominate
  • go to each bloggers page and let them know you have nominated them for the award
  • Thank the person that gave you the award and add a link on your post back to their blog

So thank you to the girls who nominated me, and be sure to check out all the blogs I recommended! 

Facts about me:
  • I have a serious beauty obsession and love the way make up can transform people
  • I hope to study English Literature at university this year
  • My dream job would be to combine my love of writing with my passion for beauty, or make up artist of course
  • I have a serious obsession with Alex Turner, most beautiful man ever
  • I study English, History and Art at sixth form
  • I am super organised and mess freaks me out
  • I find it hard to be positive but i'm working on it!
  • I've just turned 18 
  • I can get quite bad anxiety and am generally a nervy person
  • I want to live in Paris (or at least go there for a bit)
My questions from Izzy:

1.What is your Favourite lipstick?
'Sugar Plum' by No7
2. If you could only have a Leather Jacket or a Denim Jacket what would you chose?
Definitely Leather, I wear mine all the time
3. What is your goal for 2013?
My main one is to get into university
4. Who is your favourite Blogger and Youtuber?
I'm a big fan of Tanya Burr
5. What is your Favourite Restaurant?
La Tasca
6. What is your Favourite Perfume?
Jimmy Choo
7. Heels or flats?
Always heels!
8. What camera do you use for your blog posts and what is your dream camera?
I use my Nikon Coolpix, but one day I'd love a Canon SLR
9. What are your favourite hair products?
Percy & Reed conditional and my trusty Tangle Teezer
10. What is your favourite film?
Love Actually
11.What trends are you looking forward to in 2013?
Neutral pastel make up for spring, graphic print for fashion

My questions from Laura:

1. What made you start a blog?
My love of make up and all things beauty, wanting to impart that onto others
2. twitter or Facebook?
Twitter for sure!
3. What's your dream job?
Make up artist/ author
4. mac or windows?
Never had the privilege of owning a Mac so Windows!
5.heels or flats?
ALWAYS heels
6. If you could go without doing your hair or makeup, which one would you choose?
Definitely hair, love natural hair but I always need make up
7. favorite tv show?
Big Bang Theory
8. Does everyone you know, know you have a blog?
Not everyone, only told a few friends
9.What country are you from?
England
10. Do you own a onesie?
Yeah, got one for Christmas!
11. What do you like to blog about?
My make up tips and everything beauty related :)

Questions for my nominees:
1. What would you like to accomplish in 2013?
2. What is your dream job ever?
3. What made you start a blog?
4. Who is your favorite blogger at the moment?
5. What is your favorite upcoming trend?
6. What is your favourite beauty product ever?
7. What is your ultimate fashion staple?
8. Eye make up or lips?
9. High end or drugstore make up overall?
10. Do you have any statement 'investment' pieces of clothing?
11. Who is your style inspiration?

Nominees:
http://shradhaloves.blogspot.co.uk/
http://www.ofbeautyandnothingness.blogspot.co.uk/
http://www.okfashionbeauty.blogspot.co.uk/
http://reveriebelle.blogspot.co.uk/
http://love-x-beauty.blogspot.co.uk/
http://lookamillion.blogspot.co.uk/
http://glitterandlaace.blogspot.co.uk/
http://mimsmake-up.blogspot.co.uk/

<3

Saturday 12 January 2013

Perfecting Your Brows

Achieving that 'perfect' brow look is something that can be quite difficult to grasp. Everybody has naturally different eyebrow shapes and there is not one set way for everyone. The key is to find your natural shape and make the most of them. Beautifully groomed brows make a huge difference to anyone. Naturally, I have super thick and dark eyebrows. Years ago, I used to hate them thinking they were far too big, overshadowing my small face, and couldn't wait to get the tweezers on them. Now, I love the shape of my eyebrows; I have finally got my desired shape, and I am now thankful for their thickness! However, if you are not blessed with thick, defined eye brows then there are natural looking ways to make the most of them. Eyebrows frame the face and add definition to your eyes, so it is something worth paying attention too. Eyes and eyebrows are my favorite features on the face, I absolutely love doing peoples eyebrows as I think they can be one of the biggest transformations of the face and even the most naturally perfect browns can benefit from some added definition. Once the brows have been groomed, it is also super easy to do your own upkeep. 

To help with working out your shape, I have rounded up some of the best celebrity brows as inspiration...


Cara Delevingne is probably one of the most iconic brow trend setters around right now. She is blessed with naturally dark eyebrows that are super thick. This is dramatically enhanced for photo shoots (see above image) as she has a lot to work with, yet they somehow still manage to look great! In this photo they have been darkened and defined to create statement brows, forming a frame for her equally beautiful eyes. Her shape is quite straight, but they still diagonally point upwards to add an arch to her eye. However, I can't help feel if I did my brows this dramatically, they would look ridiculous! I think that they clearly work for her and the work she does, but on ordinary people I think a natural look is much more suited. 


Kim Kardashian has the most beautiful shape to her eyebrows. What I love about hers is exactly that, the shaping. The arch just about three quarters across the brow really sculpts her face. 


Katy Perry is the celebrity who I have found has the most similar brows to me. They are quite rounded, naturally dark, and thick.


All you need to transform a face is just:
>Tweezers
>Shadow
>Angled brush
>A brow brush
>Brow gel

Brow coloring:
One of the most crucial parts to grooming your brows is choosing the right colour. You may have shaped them perfectly, but a common mistake is to use a much darker colour than your brow, creating a completely unnatural and 'drawn on' effect- not a good look. When I chose my brow powder, I brought a shade that was slightly darker than my brows, and another that was slightly lighter. My idea was to mix the two, but I have found it always works best to go with the lighter colour as that will give you the most natural looking appearance.

If you have blond eye brows- use ash blond
Light brown- use sable/ light brown
Red- use ash blond/ camel
Brunette- use mahogany/ warm brown
Black- use darkest brown/ dark gray (never use black!)

How I fill in my brows:
1. Use a brow brush to brush your brows in an upward motion so all the hairs stick up a bit. Then comb the hairs in the natural shape of your brow.

2. For me, powder gives the most natural and most long lasting finish. Get your angled brush and powder and lightly use some of the product . Start at the inner corner of the brow, using light feathery strokes in the same direction as your hair growth. Make sure you fill in all the gaps in the brow hair.

3. Then bring the brush into the center, creating an arch shape and then turn the brush and go down. Extend the edge slightly, making sure the brow is long enough to finish just after your eye, on a diagonal with the outer corner of your eye. 

4. Use brow gel to keep unruly brows intact- mine is from No7.


Even though my shaping is fine (above), the brow that is filled in (right) is darker and appears thicker. It is more arched due to using short upward strokes with the brush, and it generally looked more refined. This an example of how filling in your brows can really shape and define them, transforming your face. 


Brown Smokey Eye Look

Hey guys!
So last night I went to a friend's 18th party, and I thought it was a great opportunity to wear my favorite evening make up look ever- a classic brown smokey eye. I think this look is a brilliant take on the smokey eye because it is a lot less intense than the conventional black, a lot more subtle and glamorous, very much in the style of Kim Kardashian I think!
This look is all centered around the eye, complemented with flawless skin, bronzed sculpted cheeks and a paired nude lip.


To get this look I used the following products (In order of applying):

  • No7 mousse foundation (discontinued- sorry!)
  • Lacura concealer pen and Rimmel hide the blemish concealer 
  • No7 translucent powder and Rimmel stay matte powder 
  • MUA brown shadow in shade 19 for brows
  • Frontcover eye primer
  • MUA palette in 'Heaven and Earth'- (third shade bottom row), (first shade top row)
  • No7 palette brown metallic shade
  • Maybelline gel liner
  • Max Factor liquid effect eye pencil in 'Brown Blaze'
  • MAC Opulash mascara
  • No7 mini mascara for bottom lashes
  • Sleek blusher in 'Sahara'
  • Sleek blusher in 'Pixie Pink'
  • Benefit High Beam
  • Revlon Super Lustrous Lipstick in shade 'Sky Line Pink'
  • Soap and Glory 'Sexy Mother Pucker' clear lipgloss
OR///
  • Rimmel lipstick in 'Diva Red'


For the eyes, the first step for any eye make up look using a lot of shadow, is to prime. This is a really important step to stop your eye shadow from slipping and creasing, especially if you have oily eyelids. I would like to point out that my eye make up stayed on all night right up until I took it off, still looking perfect thanks to the primer. I also think the MUA shadows are really good for staying put, and the price is insane at £4 for a palette of 12 shadows! After you've done this with your favorite primer (mine is from Frontcover cosmetics), layer the lightest colour of shadow all across the lid, taking it onto the tear duct, into the crease, and faintly up to the brow bone. Next, taking your dark brown shade, take this through the crease and out slightly. Then take a clean brush to blend so there is no harsh lines. Then apply a light shimmery colour on the brow bone, and blend again into the dark shadow to create a seamless effect. Taking this highlighter onto the tear duct will really bring out your eyes too. 

For bronzer, (I used a Sleek blusher), find the hollow of your cheeks- just below your cheekbone- and using light, circular motions blend onto the skin, taking care to not extend this line too much. Then pop a pretty light pink blusher (Pixie Pink is perfect for this) and put this on the apple of your cheeks, (the easiest way to find this is to smile, and its the most raised part) so you get a more natural combination of bronzer and colour.

I used a light lipstick for this look as I wanted the eyes to be the main focus, however it also suits a really chic bold red lip if you dare to do so, just make sure you wear it with confidence!

What's on my nails?

I applied this black nail varnish with this 'Yellow Topaz Glitter' as a top coat from Barry M, on New Years Eve. And it is still on! I think that's pretty impressive, it hasn't even chipped! This just goes to show that if you apply a top coat it really helps keep your polish intact for much longer. A pretty sparkly one like this also adds a new dimension to the nails, much more exciting than a clear one whilst still bringing the same glossy finish. 


 What is your favorite glamorous evening make up look?
xxx


Monday 7 January 2013

Glamorous Make-Up Look

Recently I went to a party where I wore this make-up look. I couldn't decide what to wear so I did this simple, yet glamorous make-up first which would fit into any outfit. The key is well defined eyes paired with a neutral, yet sparkly shimmer base, topped off with a stand out bold lip in this luscious fuchsia colour- perfect for next season.


To obtain that perfect feline eye look, I used my new Maybelline gel liner in intense black which is my new make-up staple; a product which has totally transformed the way I wear eye liner. It is also an amazing dupe for the classic Bobbi Brown gel liner for half the price, and the two are practically the same. This product comes with a brush already, however I like to use my own as it is much thinner and thereby makes the line much more precise and controlled. I would recommend the Real Techniques fine liner brush for a super defined line. Start right in the inner corner and carefully take it across the lash line, getting slightly thicker as you do so. What's great about gel liner is it is so easy to work with if you struggle, much easier than liquid eye liner which often takes a few attempts even for the most experienced pros. When you get to the end of the lash line, follow where your bottom lash line curves up and then join the two lines together. Take this as big or as thick as you wish, depending on the look you are going for. As I am wearing a bold lip, I went for a subtle flick to create a look that was both wearable, yet glamorous. I also took this along the bottom waterline and right along the tear duct to extend the eye and create a look that was somewhat edgy. I love this product because it makes my eyes look so much bigger than without it, and makes your lashes appear longer too, win win! 
On my lips I am wearing my new favorite lipstick, Mattene Lipstick by MAC in shade 'Rare Exotic'. I love everything about this product down to the bright daring colour, to the matte texture, but also the durability of this product as it stayed on all night without any need to reapply. What's more, it smells unbelievable which is always a bonus.
Add your favorite cream sparkly pigment on the lids, and finish the look with highlighted cheeks to enhance your cheekbones and create the perfect pretty luminescent finish- my favorite is High Beam from Benefit- pricey but it is a good investment as it lasts for ages. I've had a mini version of mine now for well over 6 months and there is still more than half left, you only need the slightest bit of it so it will last you forever. It leaves a beautiful radiant shimmer on the cheeks, yet manages to appear somewhat natural. One of my beauty favorites of all time I think!


To go with this make-up I opted for my favorite crop top from ASOS, teamed with this printed blue skirt from H&M. 

Saturday 5 January 2013

NY Resolutions


2013


Yes that's right its another new year, the time when there's yet another opportunity to reinvent, amend, and look to the future. I was a bit wary about doing a resolution post because to be fair, I never stick to them past the first month. I find sometimes setting yourself a mound of tasks to achieve in a year is too daunting so this year I simply only have a few things I would like to accomplish in 2013; which will be fabulous. 

2012 nostalgia
Here are a select few of my highs this year, which I have to admit, was a pretty alright year despite some obvious lows which we all have. In order to progress into the new year with a clear mind, it is vital to appreciate all the wonderful things that 2012 brought you- and yes if you look back, you will find there was more than you thought. 
  • going to Paris for my friends 18th the day after my exams finished
  • getting excellent AS results- something I will be forever proud of
  • Having an epic time at LEEDS festival
  • seeing Marina & the Diamonds live- my favey person ever
  • starting to blog of course!
2013 Resolutions
To be more pro-active: in other words less lazy. There is always something that needs doing whether it's homework, revision, reading, blogging etc.. Not to waste any time because this is a particularly crucial year. I've realised that things don't just magically happen for you, you don't just get handed things on a plate. If you really want something to happen you have to go out there and get it- and work hard at it. And if you fail at something you just have to keep going or else it will be unattainable. 

To get into university: self-explanatory. Not just to get into any university, but the one or ones that I really want to go to. And to make the most of it whilst i'm there. 

To continue being more positive: This was one of my main resolutions last year, and I think I have achieved it to some extent. I don't get bogged down in negative thinking as much any more which is quite an achievement as it is extremely easy for me to always see the worst in each situation. I've learnt there are always things to be grateful for, and there is always someone, somewhere in a worse position than you. Things can always be worse than they initially seem. I owe a lot to The Secret by Rhonda Byrne which I took a long time to fully grasp its main principles, and I still have a tiny bit of skepticism on certain aspects but basically, its taught me happiness is a choice, and anyone can choose to lead a happy life which is all anyone really wants. 

To make my blog the best it can be: This means a lot more views, a lot more followers, and a lot more success. Whether or not I have one follower or one million, I will continue to blog the best posts I can do. I love beauty and writing and it is something that I would one day like to combine into a full-time career. In the meantime, I love finding beauty blogs and continue to be inspired daily. 

To be more sociable: This shouldn't be a problem as I turn 18 real soon, so there will be no excuse not to go out! I want to be able to maintain the balance of managing work and going out and having fun, because you can't subordinate all your needs into one; you have to find the best of both worlds. This also fits into 'saying yes more', and being open to new opportunities and meeting new people. 

*Here's to 2013!*


What are your resolutions for 2013?
xxx


Wednesday 2 January 2013

My 6 Favourite Festive Lipsticks

Not only are these some of my all time favourite excellent quality lipsticks that are great any time of year, but they are the most beautiful colours for the festive season- which isn't over yet! The winter season is perfect for sporting this kind of bold lip, whether you go for deep, sultry purple, or that classic chic bold red.They also all have brilliant staying power because the swatches were really hard to get off my arm afterwards!


 From left to right: 
1. No7 Moisture Drench lipstick in shade 75 'Sugar Plum'
2. Rimmel Moisture Renew lipstick in shade 500 'Diva Red'
3. Max Factor in shade 830 'Dusky Rose'
4. Sleek Matte lipstick in shade 783 'Mystic'
5. No7 Moisture Drench lipstick in shade 120 'Siren'
6. MAC Mattene lipstick in 'Rare Exotic' 

A top tip for applying this kind of dark lip is to use a fine lip synthetic lip brush for a really precise finish to line the lips and perfect your natural shape. Then use the lipstick straight from the bullet, particularly darkening the center of the bottom lip to make them appear as full as possible. Add a tiny bit of highlighter just above your cupids bow to draw attention to your lips. 

Tuesday 1 January 2013

Black and Gold NYE


So seen as last night was New Year's Eve (Happy New Year!) I thought I would go for a sparkly black and gold theme. I built my make up look and nails around my dress (topshop black and gold velvet glittery) and think it really epitomized the new year theme.


  • To get my make up look I began using a primer from Nivea (Express hydration primer). I don't normally use a primer as I find that a good moisturiser does the same job, but I had this one as a sample from Glamour magazine so I thought I would give it a try. It went on so smoothly and had instant absorption as it was very thin, so I could apply my foundation super quick afterwards. 
  • For my foundation I used one from No7 which is very high coverage, unfortunately the one I used has recently been discontinued so I won't list it here because there wouldn't be much point, however a new one which is also really great is the Beautifully Matte Foundation from No7. A true match colour service is now available at No7 counters so you can really get that perfect colour match. 
  • For concealer I use my Rimmel hide the blemish concealer to go under my eyes to conceal any dark circles, and also on any blemishes. 
  • I then lock my foundation into place with my Rimmel Stay Matte powder which is my favourite powder ever, really does the trick to keep you looking shine free throughout the night. Apply liberally particularly in the center of the face where shine is most common.
  • Next I used by baked bronzer from Famous by Sue Moxley in shade Hawaii to contour my cheeks to give the appearance of naturally defined cheekbones. I also use this on my temples to give an all round glow to the skin. 
  • For blusher I used Rimmel in shade Pink Rose on the apples of my cheeks to blend into the bronzer creating a more natural look. 
  • For highlighter I used my Benefit High Beam just above the apple of my cheeks where my blusher finishes to create a luminescent finish and youthful appearance to the skin. 
  • To fill in my brows I used my MUA eye shadow using an angled brush to lightly fill in any gaps and strengthen the shape of my brows. 
  • Before applying my eye shadow I used my primer from Front Cover Cosmetics which is really an important step especially if you have quite oily eye lids and you find your shadow often creases or doesn't last.  
  • When doing a strong eye look like this one, using two colours that don't naturally blend into each other, it is key to apply the darkest colour first. I used my black shade first from a Natural Collection compact, starting slightly more than half way onto the lid. I took this up through the crease and winged it out slightly. I then used a clean brush to tidy up the line and blend thoroughly. 
  • Then I used my gold colours which is the same as the other gold look I did the other night, using both colours from Front Cover Cosmetics. Blend as best as possible into the black slightly, but not too much as you will end up with quite a murky colour. I put quite a lot of gold on the tear-duct to open the eye, as opposed to what I usually use which is white. I liberally applied the holographic glitter in the corner of the eye- after all it is NY!
  • Then I used my Maybelline gel eye liner to thinly define my lash line, winging it out quite a bit to create that feline appearance. 
  • Before applying my false lashes, I used my MAC Opulash Optimum Black mascara on top and bottom lashes, and then used my Cheryl Cole Eylure lashes. The key to applying false lashes is to leave the glue a good minute before applying so they stick better, and also to use tweezers and hold the lash in the center with the tweezers and then gently place in the middle of the lash line. Then simply tuck in the sides with the tweezers and leave to dry. I then apply a final coat of mascara to merge both natural and false lashes together. 
  • Use your favourite Kohl eye pencil to line the waterline of your lashes to define if you want that added impact. 
What's on my nails?


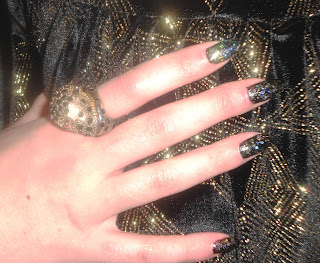
 For my nails I took the black and gold theme to the extreme by using, both from Barry M, using shades 'Black' and then using lots and lots of 'Yellow Topaz Glitter' as a top coat. Not only does this create a super sparkly festive look, but as a top coat this will make the nail polish last a lot longer. I really like this look and I got a lot of compliments particularly about the nails, so I hope that you guys have fun experimenting with it too.